Tuesday, January 11, 2011

Home Made Laundry Soap

With all the hoopla I've been seeing online about "Homemade Laundry Soap", I finally decided it was time for me to jump in and give it a whirl. I procrastinated on making it for some time because I thought that it would take forver and be a mess to make on top of buying the first time supplies would be expensive..I was wrong about all of the above..it was fast, simple and cheap to make!!
So let's begin...
To make this you need the following....

1 quart Water (boiling)

2 cups Bar soap (grated) This can be any soap but ivory or fels Naptha is what is recommended. Also recommended is glycerin soap. (which is what I used) But really the soap is your choice.

2 cups Borax
2 cups Washing Soda

1 quart Water (boiling)

2 additional Gallons of warm water


Ok so you got all those items at your local walmart in the grocery isle (over by the oxyclean..dryer sheets etc.) Rough estimate on cost is $5-$6 total.


 Add finely grated bar soap to the 2quarts boiling water and stir until soap is melted. You can keep on low heat until soap is melted.

Please Note- I used glycerin soap for 2 reason, one I had it on hand already from making it for Christmas gifts, it's a soft soap so you just have to chop it up and it melts quickly, Two because it is said to be a natural fabric softner, thus eliminating fabric softner. Altho Im not sure yet them I'm prepared to give up my liquid fabric softner because the truth is I don't buy it to make my clothes "fluffy" I buy it because it makes my clothes smell good :)
Pour the soapy water into a large, clean pail once it's ALL melted and add the Borax and Washing Soda and 2 gallons of water Stir well


I raided the recycle bin and used empty fabric softner and laundry jugs to store this in. Now when I need to use it I just shake it up and add 1/3 cup of the soap to the laundry. Which I measured and it equals a capful on my jug.


I wondered tho, how would this effect my washer since it's a HE Front Loader..so to google I went and here is some information I found.....


There is a good reason for using detergent that is specially formulated for these newer front-load washers. HE detergents are concentrated laundry detergents that are low-sudsing especially for use with low water high-efficiency washers.
If regular detergents were to be used in front-loading and high-efficiency washers, the presence of too many suds could 'confuse' washing cycles, cause delays and make proper rinsing of clothes difficult.

So it seems that this soap is doing ok in my front loader. It does not suds up like your regular soap will. But that's ok, because we all know suds are a visual and aren't really what cleans our clothes RIGHT??!!

Apon using this soap I found that it cleaned the clothes, yes even Dan's pig barn smelling jeans..there was not a scent of any kind what so ever in the jeans...they were very soft..I did however use a dryer sheet because I didn't want him walking around picking up people's socks and mittens due to static cling seeings as it's winter and dry here in Michigan.

So all in all, I've used this soap in 5 loads and all have came out clean and so far I am pleased with it. This recipe made two big jugs and then some (I ran out of jugs lol) I'd say it's worth giving a try and if you don't like it you can always use it to clean your toilets or anything else you'd need a cleaner for.

  • Now..hmm...wonder if I can figure out a way to make liquid fabric softner tee hee...

Thursday, December 30, 2010

How to make expensive vases for cheap!

The photos aren't exactly the greatest because I got a last minute whim of an idea to take a quick photo of this project, with my cell phone no less...
To buy something like this from Pottery Barn it could cost you $80. BUT to MAKE something like this it will cost you $2!!
My sisters and I always like to get each other very small gifts for Christmas, at the last minute I was stumped on what to get or make for them.
So off to the Dollar Tree I went..
I purchashed the biggest vases that they had at a buck each, and glass candle sticks..also a buck each..
Got out my handy dandy e6000 and started assembling. All you do is glue the candle stick to the bottom of the vase. Make sure all the glass is clean and free of stickers..and there you have it..
Add some ornaments, candy canes, some greenery, maybe a ribbon around the bottom..so versitile too!
Can be filled with various items for various holidays or used for candles..etc..either way I hope they enjoy them!!


Monday, December 13, 2010

Teeny Tops made from..well..tops

Tonite I was just browsing around on the internet and I came across a blog called "Creative Jewish Mom" http://www.creativejewishmom.com/2010/11/a-handmade-hanukkah-game-spinning-tops-from-plastic-bottle-caps.html#comments. Her blog was full of so much fun! She had posted these little spinning tops that she made out of bottle cap tops. I thought instantly "ah ha! Tomorrow is a snow day, two fighting boys does not sound appealing"...so off to the recycle bin I went and got 2 bottle caps. These will fit nicely in their count down to Christmas that I made last year!

Tuesday, November 9, 2010

Altered Cracker Box

So the challenge presented was
"How to reuse cereal boxes"..I seen this idea a long time
ago on the internet and kept it in the back of my mind..
I didn't have an empty cereal box, but I ddi have an empty cracker box so forward I marched...

I popped it open at the seams

I slathered it in GLUE STICK (no bubbling)
and put scrapbooking paper on it and then took my handy dandy

brayer and rubbed the heck out of it...
I put the paper over the picture part of the box. I figured that way the inside of the "bag/box" would look nicer when presented as a gift...just a thought...I think the paper would stick better for durability on the nonpainted side tho..just depends on the glue you use too probably...anyways...


I even covered the flaps of the box that would normally "close" the box up at the top..then I tucked those pieces down..again..you could snip them off..I just did it for presentation and stability..your prefrence.

Then I just glued it all back together again (I used the glue gun so it would be a bit speedier..)


Then it was on to decorations..I just kept it super simple..kinda a trial run per-say..
Punched two holes on each side of the box...


This is the other side of the box..I rather like it plain quite better actually then I do the other side..

I made a quick to/from tag with the left over scraps

Inserted some ribbon for the handles (I should made them longer but..oops ole well...trial and error again..lol..)
Stuffed in some blue tissue and there you have it...an altered cracker box suitable for gift giving...
Now I am aware that this is pretty simple and not real fancy cute..but I just wanted to give it a try and it was something to do while watching HOARDERS...so quick and easy won...I'd love to see your altered boxes if you choose to make some!!!

Sunday, November 7, 2010

Making A Fall Tree

Excuse my funky mantle right now..it's in the process of being redone and repainted..

I started out with an old cereal box...and a stencil and some free hand...

Glued them on to various scrapbook papers...

Inked the edges...


Cut them all out..... (again)


Hot glued some string on them...
Added some corrugated cardboard to a jar, plopped the branches in it..

And there you have it...a quick fall decorations..!!

Americana Snowmen Ornaments-Made from paper bags.


OooOps...I just realized that I glued the striped fabric on one of the snowmen side ways...ole' well..so much for perfectionism...
I seen a snowman somewhere online that was made of felt and sewn and super cute.
Well me being a non-sew type person I re-enacted this with my handy dandy glue gun and other supplies..
These started out as paper bags...


I pulled out the upholerstery sample book and found the material to make the pockets..another item used that cost me nothing!!! :)
Once I had them done I stuffed them with batting, glued on the jute to hang them from.
They didn't turn out the direction I was going for...but I still think they came out cute!!
They are headed to the craft show..I sure hope they find new homes!!

Thursday, October 14, 2010

Cardboard Tube Snowflake

There are so many things you can do to recycle cardboard tubes!
I seen this idea on the internet and thought it would be fun to give it a try.
Here is where I got the idea, a google search will bring you endless ideas.
I gathered my supplies and got to work.
First I took the rolls and pushed them flat(mine are both toilet paper and paper towel rolls)
The I took a ruler and marked where how big I wanted my "loops" to be.


Then I just cut all on the lines making all the loops.
I rearranged the loops how I wanted them and started glueing.
I first started out using ELMERS CRAFT BOND GLUE PEN. Which I got
as a test product for being a Bzz Agent.
It worked great. It held them together very well and calling it a "bond" is no lie.
The problem I ran into is I was having to hold the loops together until they dried.
Which it doesn't take long to dry but with all those loops I could see this quick project was going to become time consumming.
So after glueing about half the snowflake together with the Bond Glue, I decided to speed things up and break out the glue gun.

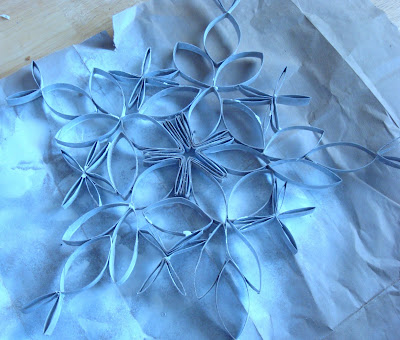
Once I got it all glued together I spray painted it white.
The cardboard absorbed the paint alot so I had to do several coats.
If you have any spray on Kilz that would work perfect for this project.

Here is the finished project. I just pinned it to the wall so you could see it. I think I will end up putting it on a string and hanging it from a window or something tho.
I like how it turned out, but I can most certainly see room for improvement.
Just for a snowflakey effect I added sparkly glitter to it.
This project was quick, fun and simple and the ideas of various snowflakes are endless.
I am going to make more. They would be so pretty hanging a bunch in different lengths and sizes from a window or sliding glass door.