Friday, November 18, 2011

A Fall Banner

Here lately I have been having so much fun making banners.
The fun thing is, there are no lines to follow, you can be as modge podge
as you want...roam free..you crafters know what Im talkin bout'!

 I like to use sturdy cardboard..usually recycled from some
sort of box..like crackers or cereal boxes..
Now I'm thinking I might need to make a Christmas banner...right after
I wash that smeared up mirror (oops!)


Some Spooky Halloween Decor..

I didn't want to put alot of Halloween decorations out this year, but I did want to do a little "something something"...besides that the boys ALWAYS ask EVERY year WHEN am I going to get the Halloween stuff out....so this year I decided to keep the Halloween decor dedicated to just the dining room.....

 Of course I had to stick my plastic daughter in there some where :)
Our monster head is one of our favorite items (Thank you again Aunt Janet)

 Putting the eyeball and spider in the skull was all Carter's idea lol..


 Some little "potions" that I am yet to make labels for..


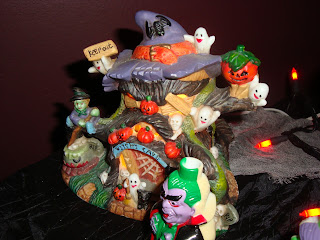
 A little haunted house (again thank you Aunt Janet) I think
it's the cutest little thing, lots of little decorations on that lil baby!

 The haunted house behind the ceramic ghost my youngest sister
made for Dan and I when we lived in our very first home. Its around 13-14years
old and I always smile every year that I pull it out! My sister is amazed I still have it! She was like 12 or 13 when she made it for me!
 This little witch is old too. I made it in highschool! I don't think
it's anything impressive, rather ugly really, but since I've made it and had
it this long already, I figure I'll keep it now, until it falls apart.
 I ADORE these candles!! (Thank you to my mother in law)
See how people support my addictions..it's great really :)
I think the faces on this ghosts are just down right stinkin adorable!!
I keep them in their package because I don't want them to get
dusty or their little noses to fall of or something tragic that would make me cry :)

Tuesday, April 5, 2011

{Easy Spring Wreath}...and ooh so cute

I came across this idea while looking thru a blog hop and drooling over everyone's projects..!!
This is not MY idea..I totally copied it! And I love it :)
I got this idea off of "Keeping It Simple"
You won't beleive how easy this was..and ah hem..MESSY :)
She made up a tutorial on how to make this VERY SIMPLE and CHEAP wreath..you should all go check it out. It only cost me like $3 bucks to make it and I still had supplies left when I was done!
It's nice and bright and even the hubs says it makes the door look "cheery"..and he's color blind lol..

Tuesday, March 8, 2011

A wee bit O' Green....

This project is NOT I repeat NOT complete..
I'm stuck at a stand still on it..
It didn't end up going the direction I was aiming for so for now it's been set aside..
So eventually (before March is over) I will finish it so you will just have to come back and
see the final results..hopefully it's something to brag about ha ha!
This started out as a ugly gold and brown picture frame..Hello black spray paint!
For the shamrock I cut 3 hearts out of an old cracker box, then I glue the hearts onto a 50 year old dictionary page and recut the hearts out again..
Then....I took a COFFEE FILTER (I really should do a tutorial on this) and folder the filter up into a triangle and rubbed green and brown ink ALL OVER IT..then I ran it under water to let it all run together then I set it in front of the heater to dry (didnt take long at all)
Then I got out my handy dandy decoupage (Love that stuff!) and deco'd the filter hearts (I traced them using the next smallest heart cookie cutter) ..the results are awesome and kind a cloudy transparent look. Click on the pic to see it in better detail.
I used glue dots to attach it to the glass.
I also colored the clear glass a green color. You REALLY MUST try this!! 
You take modge podge and put a few drops of food coloring in it and mix it all up, then you paint it on your glass. It will look like a creamy color but when it dries it's clear. It's so awesome and the possibilities are endless!! I wish I remembered where I seen the tutorial on how to do this!
I will make one next time I do this technique..

So here is what I got so far...was going for a vintage look but don't feel Im on the right path..we shall see how it turns out in the end...stay tuned!

Monday, March 7, 2011

I've been awarded! Yay me! TWICE!

I've been awarded !!
Twice in one week two different people have awarded me with this award!
What an honor!
Thank you both to Binge Crafter  and Candy,Cakes, and Crafts!

Now I get to pass this on:


Rule #1: Link back to the person who gave you the award (see above)
Rule #2: Share seven random things about yourself.
So...
1. I am a major clutter bug.
2. My crafts side track me
3. Im a procrastinator BIG TIME
4. Im scared of everything..frogs..snakes..bugs..spiders..dark..lol
5. I talk to my baby sister on the phone no less then 5 times a day.
6. I start my morning out everyday with coffee and facebook...SHAME ON ME :)
7. I am addicted to looking thru blogs. I will start looking at one and before I know it Im still thumbing thru them in the evening!!
Rule # 3 Award seven newly discovered bloggers with this award.
Here are some blogs for you to check out:
http://8thingsaboutme.blogspot.com/
http://www.yesterdayontuesday.com/
http://www.blessedlittlenest.com/
http://onegirlinpink.blogspot.com/


Saturday, February 26, 2011

Altered Butterfly Cd

I started working on this project earlier last week, but it came to a halt when I caught the kitchen
on fire and needed to get to work cleaning up that mess.
I was making this for one of my very best friends and today, she happen to come over and help me the entire day with cleaning up A TON of soot!
So after I was "burned out" on cleaning later this evening I decided I was going to finish it up and give it to her tomorrow at church.
It didn't turn out as well as I was hoping and Im still trying to decide if it needs more added to it..but here's what I got..
It started out as two cd's. I decoupaged one cd with a piece of sheet music from a 1910 old hymn book, then I sandwiched the lace and glue between the 2 cds and smushed it with my super heavy book that I have named "the smushing book"...after that was dry I added dots of hot glue and I set the butterfly punchies on it to give it a raised effect...I'm still thinking it needs something...pearls...pink beads..Im not for sure, ..But anyways I just wanted to show you another idea for altered cd's...


Sunday, February 13, 2011

Happy Valentine's Day!!

We seen this idea on "Family Fun". (Love that site!) And Carter (my 8 year old) wanted to make these for his Valentine's instead of giving out paper ones.
The initial idea sounded cool..and truely it was easy..but when you wait till the VERY last minute to do this it becomes work..lol..
If you have never made home made play dough you really should give it a try. It's VERY easy and was made in like a total of 15 minutes-seriously! And it was fun to watch it transform...however I think I need to start using the shake weight, this stuff gave my arm a work out lol..
Ok so here is the recipe from Family Fun...

Materials


3 Cups of white flour


1 1/2 Cups of salt


1 1/2 Tablespoons of cream of tartar


3 1/4 Cups of water


6 Tablespoons of vegetable oil


Red food coloring


Rolling pin

Cookie Cutter of your choice..obviously we used a heart....


In a medium sauce pan mix all the dry ingredients with a wisk or fork. mix them together well.
In a separate bow mix all the wet ingredients. Add your food coloring until you get your desired color. I used gel food coloring..and the color did not come off on our hands when the dough was played with.
Pour the wet ingredients in with the dry, turn your burner on medium and continuously stir...don't stop stirring you don't want it to scorch.
Once you get it all stirred it will be super smooth liquid for a little bit then all of a sudden you will notice that it's getting lumps all over it..don't freak out this is normal..it's beginning to thicken..yay that's what you want.
As you are stirring it you will feel it getting thicker and thicker and your arm will seem to get wimpier and wimpier (I promise ) This will take around 10 minutes,..once it has gotton thick enough that you can't stir it anymore, let it sit and cool.

Once it's cool, knead the dough and roll it around into balls to be prepared to be rolled out. I thought it would be cool at this point to add red glitter but the boy didn't think so...what does he know about cool???

Roll out flat and cut with your cookie cutters. I got lucky and went to Dollar Tree and found these ziplock bags with hearts all over the outside. Perfect for the dough. I was going to add a real fancy to/from tag but decided against it..I didn't really feel like taking the time to do it in all honesty!
We bagged em up and Carter wrote his name on them..as you can see we didn't even pay attention that the hearts even went in right side up..lazy I tell ya lazy lol..so there ya have it. Simple as that..not real "boyish" like I think Carter was hoping for...but I think the kids will like it..I mean really who doesn't love play dough..?? Oh that's right...other mom's lol..I see a future beating at the next PTO meeting ha ha..!!
Have a wonderful Valentine's Day!!

Friday, February 11, 2011

Vintage Heart Garland


All things vintage captures my heart! I am in LOVE with vintage..old..raggedy..primitive everything!!
I needed something to add to my hutch that is full of lots of vintage items, so I knew whatever it was that I was going to make I wanted it to look old...and here is what I came up with..

Of course it's not REALLY vintage (completely) but it's the look I was going for. And I did use some vintage items.

I started out using an empty cereal box and cut out the 3 hearts, then I decoupaged the hearts with pages from an old 1940's beat up dictionary..
The lace around the edges and the lace I used for the rosettes were made using vintage lace as well..
 Notice the pearls I used...yep vintage as well!
 This last heart wasn't exactly what I was going for..but well..once you glue something down with good glue..well..it's stuck for life lol...
 And here is the final product. I am very happy with how it came out!
I may still add a little red "something" to the heart with the rosettes on it, it looks kinda bare...yes??

Wednesday, February 2, 2011

Heart Rag Wreath

Not the greatest photo..sorry for the blurriness..
Basically I took red and check material and cut it into strips and tied it onto a metal hanger and shaped it into a heart. A bit time consumming and my finger eventually felt raw from tying all the knots..but pretty simple.
I made this for the front door and the good thing about it is you can do it while watching tv..
What I learned: I must invest in a material pizza cutter looking thingamabob!!

Valentine's Day Gift...from the young at heart..

Ahhh..young love..its so sweet..and precious..and DRAMATIC....but puppy love is something of wonder and excitement!!
My son asked me to make his little girlfriend a "Valentine's Necklace" so he can give it to her as a gift.
Not sure of this young ladies "style" made it a bit of a challenge. These are the beads we picked out.
I might make earrings and a bracelet to match but we shall see..depends on how ambitious I might get :)
Notice the 2 hearts..that was Caleb's idea...everyone say..awwww!!
She is 12 so hopefully this is something she will like...Im sure since it's coming from the boyfriend and they are both love struck she will love it. I think Dan coulda gave me a bread tie and I'd of been swooney over it!!

And my model for today is the lovely "Chappy"...not sure if he's trying to go for the Octomom lips or if he just has a bad addiction of licking his lips..but seriously could we please go one winter without the rash attack??
I love how he's game for anything..try on a girly necklace sure.!!


Wednesday, January 26, 2011

And so Valentine Decorations are creeping out...

  • I decided to put away the winter stuff and put together a little table setting for Valentine's Day.
  • I bought the two large red candles at walmart for $1.35 each. I think I am going to glue them to glass candle sticks as well (eventually). The glass pedistal holder I put together using a floating candle cup and a glass candle stick holder. (see directions in pervious post). I then added a votive holder to the middle and surrounded the candle holder with conversation hearts...works for now..Im not sure Im 100% pleased with it, but it'll do for now!!


Tuesday, January 11, 2011

Home Made Laundry Soap

With all the hoopla I've been seeing online about "Homemade Laundry Soap", I finally decided it was time for me to jump in and give it a whirl. I procrastinated on making it for some time because I thought that it would take forver and be a mess to make on top of buying the first time supplies would be expensive..I was wrong about all of the above..it was fast, simple and cheap to make!!
So let's begin...
To make this you need the following....

1 quart Water (boiling)

2 cups Bar soap (grated) This can be any soap but ivory or fels Naptha is what is recommended. Also recommended is glycerin soap. (which is what I used) But really the soap is your choice.

2 cups Borax
2 cups Washing Soda

1 quart Water (boiling)

2 additional Gallons of warm water


Ok so you got all those items at your local walmart in the grocery isle (over by the oxyclean..dryer sheets etc.) Rough estimate on cost is $5-$6 total.


 Add finely grated bar soap to the 2quarts boiling water and stir until soap is melted. You can keep on low heat until soap is melted.

Please Note- I used glycerin soap for 2 reason, one I had it on hand already from making it for Christmas gifts, it's a soft soap so you just have to chop it up and it melts quickly, Two because it is said to be a natural fabric softner, thus eliminating fabric softner. Altho Im not sure yet them I'm prepared to give up my liquid fabric softner because the truth is I don't buy it to make my clothes "fluffy" I buy it because it makes my clothes smell good :)
Pour the soapy water into a large, clean pail once it's ALL melted and add the Borax and Washing Soda and 2 gallons of water Stir well


I raided the recycle bin and used empty fabric softner and laundry jugs to store this in. Now when I need to use it I just shake it up and add 1/3 cup of the soap to the laundry. Which I measured and it equals a capful on my jug.


I wondered tho, how would this effect my washer since it's a HE Front Loader..so to google I went and here is some information I found.....


There is a good reason for using detergent that is specially formulated for these newer front-load washers. HE detergents are concentrated laundry detergents that are low-sudsing especially for use with low water high-efficiency washers.
If regular detergents were to be used in front-loading and high-efficiency washers, the presence of too many suds could 'confuse' washing cycles, cause delays and make proper rinsing of clothes difficult.

So it seems that this soap is doing ok in my front loader. It does not suds up like your regular soap will. But that's ok, because we all know suds are a visual and aren't really what cleans our clothes RIGHT??!!

Apon using this soap I found that it cleaned the clothes, yes even Dan's pig barn smelling jeans..there was not a scent of any kind what so ever in the jeans...they were very soft..I did however use a dryer sheet because I didn't want him walking around picking up people's socks and mittens due to static cling seeings as it's winter and dry here in Michigan.

So all in all, I've used this soap in 5 loads and all have came out clean and so far I am pleased with it. This recipe made two big jugs and then some (I ran out of jugs lol) I'd say it's worth giving a try and if you don't like it you can always use it to clean your toilets or anything else you'd need a cleaner for.

  • Now..hmm...wonder if I can figure out a way to make liquid fabric softner tee hee...