 Ok
Ok I'm going to try to explain this the best I can.
To make your own pattern for a paper piecing
is fairly easy. It can be time consuming but it's not
that bad-honest.
The penguin pattern using is actually a rubber stamp.
I stamped it onto a piece of paper in black ink, then I scanned
it into my computer enlarged it and printed...
Basically to make this penguin into a PP I have to pretty much
"dissect" the pattern. Meaning I had to cut each piece of it off.
Following the pictures below will give you a general idea.
 First I cut the hat off the penguin.
The reason for that is so I could get the black body
outline of the penguin.
 I then placed the pattern face down and traced it.
As you can see, this is how I got the black part of the body

Next I cut all the black part of the body off of the pattern
time to trace the white part of the body.
I left the other pieces intact on the body so that it did not
mess it up when I traced it.
You will eventually cut the rest apart as well. But in the mean
time leave them attached
 As you can see here, there are gaps along the edge from
where the scarf and stars are. If you don't think you can cut without having it
filled in go ahead and connect the lines. It don't have to be perfect.
 Here it is with the lines filled in.
 Ok, now it's time to really dissect the pattern.
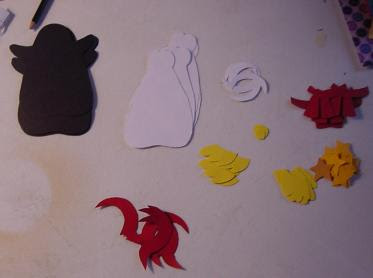
I cut the rest of the smaller pieces apart from the pattern.
Just as I did the body, face down, and trace on the color you choose.
 Ok here are all the pieces...it is now time to assemble.
Now all you do is rebuild the pattern. You may want to print two copies of your pattern if you aren't sure you'll remember how to assemble
 I Also want to mention, that you will have LOTS of little scraps.
Instead of throwing them away, toss them in a blender with water and make some handmade paper (check out my paper making in "fun techniques)
Waste not want not!!
 Here he is all assembled.
Only thing left to do is add the final details to liven him up!
 And here is the final project!
Isn't he so cute!!!
You might notice I did not add the stars to mine. I had intentions on doing so, but it was for a swap and I ran out of time (due to my procrastinating)
If anyone is interested I think I might still have this penguin saved on my computer. Leave me your email if you want it and I will send it to you!


He is so cute. Great tutorial.
ReplyDelete